Enhanced email delivery service domain settings
Related information
 Related topics
Our enhanced email delivery service supports DomainKeys Identified Mail (DKIM) authentication, the industry-leading standard for email security. DKIM ensures that your emails are delivered to their intended recipients quickly and reliably.
After you authenticate your domains, you can send emails only from your main domain. If you want to send authenticated emails from one or multiple subdomains, you need to authenticate them individually.
company.domain.com in the enhanced email delivery service, this does not allow you to send authenticated emails from domain.com. To send authenticated emails from domain.com, you need to authenticate that domain separately.| Subscription | Administration |
|---|---|
| Regional availability |
All regions |
| User type | Business user with admin privileges |
| Permissions | Company info: View and Edit |
View domain list
The enhanced email delivery service supports multiple domains. To view the domains associated with your company:
-
Go to Company > Setup > Company.
-
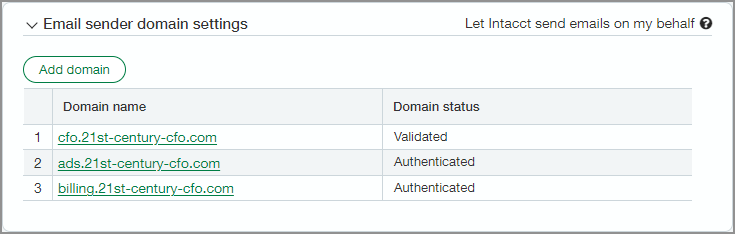
Go to the Security tab and scroll down to Email sender domain settings to view a table of domains and their statues.
The Email sender domain settings section contains a table of domains for your company and the status of each domain.
-
Authenticated domains need to be validated before you can start sending authenticated emails from them (with SPF and DKIM).
-
Validated domains are ready to send authenticated emails.
Sage Intacct has updated all companies to the enhanced email delivery service.
-
If your domain is not validated for this service, error logs for sent emails are in the standard Email delivery history.
-
If your domain is validated, error logs are in the Enhanced email delivery history.
Authenticate and validate a domain workflow
Adding a new domain to Intacct requires three steps:
Step 1: Add and authenticate a domain
Step 2: Add DNS keys to your DNS server
Step 1. Add and authenticate a domain
The enhanced email delivery service supports multiple domains.
To add a domain:
-
Go to Company > Setup > Company.
For consoles, go to My practice or Console > More > Configuration.
-
Go to the Security tab and select Edit.
-
Scroll down to Email sender domain settings.
-
Select Add a domain.
Domain configuration opens.
-
Enter your Email sender domain.
For example, if you enter example.com, then emails will be sent from intacct-mailservice@example.com.
-
Select Authenticate domain.
When the authentication process is complete, a table of Intacct-generated DNS (Domain Name System) keys is available for the authenticated domain.
Step 2. Add DNS keys to your DNS server
Add the Intacct-generated DNS keys to your domain's DNS server. Your business email administrator can help with this process.
If you do not have an email admin, sign in to your DNS provider (for example, your domain registrar or hosting service) and add the records exactly as provided.
For each record:
-
Use the record type (CNAME or TXT) shown in Sage Intacct.
-
Enter the host/name and value exactly as listed.
-
Do not modify spacing, punctuation, or quotation marks in TXT records.
Come back to the Email sender domain settings to validate your domain after the DNS keys have been added to your DNS configuration.
Example of DNS keys
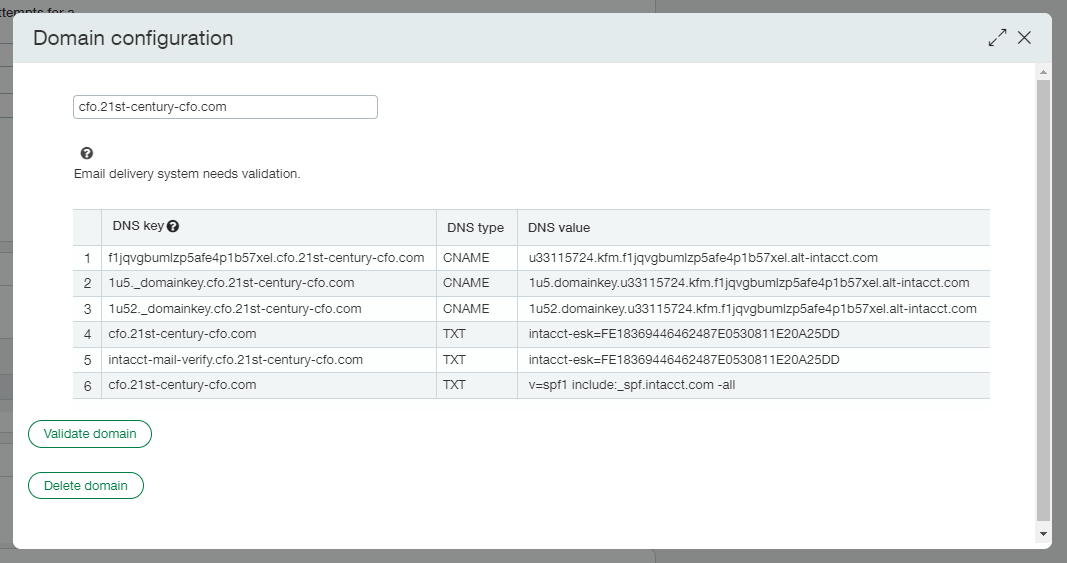
An example of a DNS key table is below. Each authenticated domain has a corresponding table of DNS keys.
-
Row 1: The CNAME used to configure the SPF record.
-
Row 2 and 3: The two CNAMEs used to configure DKIM authentication.
-
Row 4 and 5: One or two TXT strings that are used to configure EKS.
-
Row 6: One TXT string used to configure SPF for the previous email delivery service (for backwards compatibility).
For consoles, use the TXT that contains the console's ESK key.
Step 3. Validate a domain
After the DNS keys have been added to your DNS configuration, validate your domain.
-
Go to Company > Setup > Company.
-
Go to the Security tab and select Edit.
-
Scroll down to Email sender domain settings.
-
Select the domain name to be validated from the list in the table.
Domain configuration opens.
-
Select Validate domain.
Console-managed domain inheritance
If a company is linked to a Console, email sender domains that the Console has validated are shared with that company automatically. There is no need to validate the domains for child consoles yourself.
Domain inheritance works across multiple levels. If a company sits below more than one Console in a hierarchy, the domains are shared with all of them, not just the one directly above you.
How inherited domains appear:
-
Inherited domains appear in your Email sender domain settings table with a status of Validate (Console).
-
You cannot delete a Console-managed domain from a descendant company. Only the Console that owns the domain can remove it.
-
If the same domain exists at both the Console level and your company level, the Console-validated domain takes precedence.
Important notes about consoles
-
Email logs remain available at the company level and are not aggregated at the console.
-
Standalone companies continue to validate domains at the company level.
Troubleshooting the enhanced email delivery service setup
Authenticate domain failed
If Authenticate domain failed, wait 5 minutes and try again.
Validate domain failed
If Validate domain failed, be aware it can take up to 72 hours for the new DNS entries to be updated. Intacct recommends that you verify the DNS keys were entered correctly, wait 10 minutes, and try again.
If the issue persists, use https://mxtoolbox.com/ to check if the DNS entries were added, and work as expected. Use the Domain Name search to find your email sender domain. Scroll down to the Test and Result table to check for possible errors. For more information, see Validate DNS entries—Enhanced email delivery service.
Intacct has provided instructions for verifying the DNS keys using https://mxtoolbox.com/ to check if the DNS entries were added, and work as expected. Use the Domain Name search to find your email sender domain. Scroll down to the Test and Result table to check for possible errors. For more information, see Validate DNS entries—Enhanced email delivery service.
Delete a domain
-
Go to Company > Setup > Company.
-
Go to the Security tab and select Edit.
-
Scroll down to Email sender domain settings.
-
Select the domain name to be deleted from the list in the table.
Domain configuration opens.
-
Select Delete domain.
The domain is deleted and removed from the list of email sender domains.
Field descriptions
| Field | Description |
|---|---|
|
Email sender domain |
Enter your domain here. For example, if you enter example.com, emails will be sent from this domain, any sub-domains, and from any user you specify when sending the email.. |
|
Email sender key |
A unique and static key generated for each company. Add this key to your domain's TXT records to prevent spoofing and to specify that Intacct is allowed to send emails on your behalf. Your email sender key is: |
|
Domain name |
The domains you have added to your company. For example, if you enter example.com, emails will be sent from this domain, any sub-domains, and from any user you specify when sending the email and example.com is listed in the table. Select the domain name to get the DNS key information for that domain. |
|
Domain status |
Authenticated or validated.
|
|
Enforce DNS validation |
Select this checkbox to prompt Intacct to validate your DNS record and check for your email sender key that provides additional security and prevents spoofing. Used only with the standard email sender domain setting configuration.
|
